Paint tools
Everything you draw with lives in one strip above the canvas. Every tool has a one-key shortcut — the little letter under each icon.

- Undo — Ctrl+Z
- Redo — Ctrl+Shift+Z
- Pencil — B
- Eraser — E
- Fill — G
- Pick colour — I
- Line — L
- Rectangle — U
- Shade — S
- Dither — D
- Select — M
- Brush size
- Opacity
- Mirror X
- Pixel grid
- Texture areas
- Import a PNG
Numbers 12 to 17 are covered on the next page, Brush size, mirror and guides.
The nine drawing tools
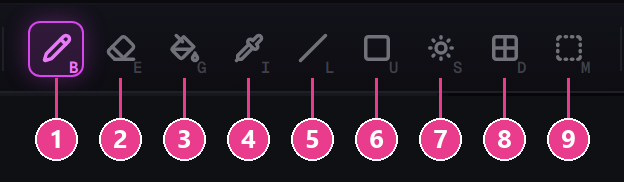
- Pencil (B)
- Eraser (E)
- Fill (G)
- Pick colour (I)
- Line (L)
- Rectangle (U)
- Shade (S)
- Dither (D)
- Select (M)
1 · Pencil (B)
The one you'll use most. Click or drag to lay down pixels. Size comes from the Brush slider.
2 · Eraser (E)
Rubs pixels out, back to transparent. Same size control as the pencil.
3 · Fill (G)
Click once and it floods a whole area with your colour. It stops at the edges of the part you clicked, so filling an arm won't leak onto the chest. The fastest way to block in a base colour.
4 · Pick colour (I)
Click anything — on the model or the flat sheet — and that colour becomes your current colour.
5 · Line (L)
Press and drag. A straight line follows your mouse; let go to commit it.
6 · Rectangle (U)
Press and drag to pull out a box. While it's selected, two extra buttons appear in the toolbar:

- Outline only — draws just the border.
- Filled — draws a solid box.
7 · Shade (S)
Lightens or darkens what's already there instead of painting a new colour. Left-click lightens, right-click darkens. Go over the same spot again to push it further. This is how you get depth without mixing colours by hand.
8 · Dither (D)
Paints a checkerboard instead of a solid block — the classic pixel-art trick for blending two colours into each other.
9 · Select (M)
Drag a box around some pixels to lift them out. Once lifted you can move, rotate and scale them, and the toolbar turns into a Transform bar:
- Rotate 90° left / right
- Scale to fit the canvas
- Pixel snap — keeps the piece landing on whole pixels
- Aspect ratio lock — stops it stretching out of shape
- Whole-multiple scaling — 2×, 3×, ½ only, which keeps pixel art crisp
- Cancel (Esc) or Apply (Enter)
Picking any drawing tool while something is floating drops it in place automatically.
Two colours at once
You always have a primary and a secondary colour. Left-click paints the primary, right-click paints the secondary. Press X to swap them. It saves an enormous amount of clicking.
Every shortcut
| Key | Does |
|---|---|
| B E G I | Pencil · Eraser · Fill · Pick colour |
| L U S D M | Line · Rectangle · Shade · Dither · Select |
| X | Swap primary / secondary colour |
| Alt (hold) | Temporary colour picker |
| Ctrl+Z / Ctrl+Shift+Z | Undo / redo |