Layers
Layers are sheets of transparent film stacked on top of each other. Paint the base metal on one and the trim on another, and you can redo the trim without touching the metal.
The buttons along the top
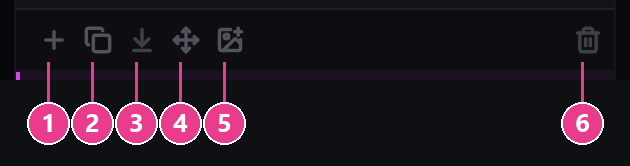
- Add layer — a new empty sheet above the current one.
- Duplicate layer — an exact copy. Use it before trying something risky.
- Merge down — squashes this layer into the one below. The picture stays the same; you just get one layer instead of two.
- Transform layer — lifts everything on this layer so you can move, rotate or scale it all at once.
- Import image as layer — brings a PNG in as a new layer.
- Delete layer — removes it. Greyed out if it's the only one.
Each layer row
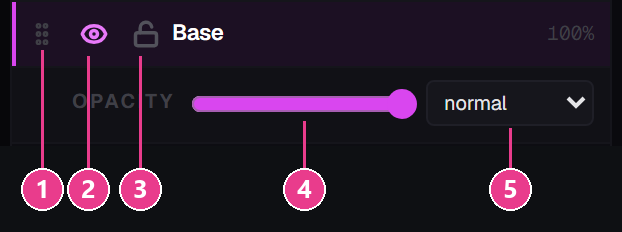
- Drag handle — drag a row up or down to reorder. Top of the list = in front.
- Eye — hide or show this layer. Hidden layers don't export.
- Padlock — lock it so you can't paint on it by mistake.
- Opacity — how see-through the whole layer is.
- Blend mode — how this layer mixes with the ones below.
The right-hand end of each row shows its blend mode and opacity at a glance, like multiply · 60%.
Blend modes in plain terms
| Mode | Use it for |
|---|---|
normal | Just paint. Covers what's underneath. |
multiply | Shadows and dirt. Only ever darkens. |
screen | Glow and highlights. Only ever lightens. |
overlay | Boosts contrast — deepens darks and brightens lights. |
add | Strong glow. Good for lava cracks and enchanted edges. |
Layers can't be renamed. New ones get a generic name and imported ones are named after the file. Keep the stack short and you won't need names.
A layer setup that works
- Base — flat colour, filled with the Fill tool.
- Shading — set to
multiply, paint your shadows. - Detail — rivets, straps, scratches, on
normal. - Glow — set to
add, for anything that should look lit.
Keyboard
With a layer row focused, Alt+↑ and Alt+↓ move it up and down the stack.