NxMenu
☁️ The Future of Menu Building

Building serious server menus — shops, profiles, kit selectors, leaderboards — normally means writing thousands of lines of YAML, fighting with Custom Model Data IDs, and reloading the server every time you tweak a pixel.
NxMenu replaces all of that with two cloud-based tools that talk to each other:
- The Menu Builder (🧠 Logic) — A visual editor where you drag items into slots, build click-action chains, set conditions, and create variables. This is where you decide what your menu does.
- The Texture Studio (🎨 Visuals) — A pixel-art IDE where you paint custom GUI backgrounds and clickable icons. Output: an auto-generated resource pack. This is where you decide what your menu looks like.
Both tools sync to your server with one in-game command. No restarts, no manual file edits, no YAML.
The Mental Model
1. Custom GUI Titles — Texture Studio paints a background, gives you a magic title string, you paste it into a Menu's Display Title.
2. Custom Icons via PAPER:CMD — Texture Studio paints a 18×18 icon and assigns it a Custom Model Data number. You use
PAPER:10001 as the material in the Menu Builder.🚀 Installation & Setup
NxMenu requires a valid license key to communicate with the Cloud Studio. Follow these steps to activate your plugin.
⚡ Step-by-Step Setup
- Install the Plugin: Place
NxMenu.jarinto your server's/pluginsfolder. - Claim Your License: Go to the secure portal at https://nexo.infinitee.work/NxMenu/claim.php and enter your BuiltByBit User ID to generate your unique key.
- Add to Config: Open
plugins/NxMenu/config.ymland paste your key inside the quotes:license-key: "YOUR_KEY_HERE" - Restart Server: Restart your server. Check the console for the green "License verified successfully!" message.
- Open Studio: Type
/nxmenu editorin-game to generate your secure workspace link.
🔑 About Editor Sessions
Every time you run /nxmenu editor, the plugin generates a unique secure URL that expires after 1 hour of inactivity. While you have the editor tab open, a heartbeat keeps your session alive automatically. If you close the tab and come back later, just run the command again — your work is saved locally in your browser, so nothing is lost.
⚡ Make Your First Menu in 5 Minutes
Let's build a simple /spawn menu with a teleport button and a server info button.
Step 1: Open the Editor
In-game, type:
/nxmenu editor
Click the secure link in chat. Your studio loads instantly.
Step 2: Configure the Menu
The default main menu is already loaded. In the right Inspector panel:
- Set FILE ID to
spawn_menu - Set TRIGGER to
spawn(this becomes the slash command that opens it) - Set DISPLAY TITLE to
&8&l» &fSpawn Menu - Set ROWS to
3
Step 3: Add the Teleport Button
Click slot 11 on the GUI canvas (second row, third slot). The Slot Workspace appears on the right.
In the VISUAL tab:
- Material:
ENDER_PEARL - Name:
&b&lTeleport to Spawn - Lore:
&7Click to warp home! - Check GLOW
Switch to the LEFT tab. Click + to add a [player] command, set it to spawn. Add another action [sound] ENTITY_ENDERMAN_TELEPORT. Add [close] to close the menu after.
Step 4: Add the Info Button
Click slot 15. Set Material to BOOK, Name to &e&lServer Info, and add a [message] action with text &aWelcome to my server, %player%!.
Step 5: Deploy
Click the blue DEPLOY button in the top right. A modal appears with a command like:
/nxmenu applyedit a3f8e2c1
Copy it, paste in-game. The plugin downloads your menu instantly. Now type /spawn in-game — your menu opens! 🎉
🏗️ The Menu Builder Interface
The Menu Builder is your logic workspace. Open it with /nxmenu editor.
🔝 Top Toolbar (Left to Right)
- NXMENU STUDIO — The brand badge.
- ⌨ DOCS — Opens an in-app quick reference.
- ⇣ IMPORT — Upload a
.zipor.jsonpackage shared by another creator. A 3-column picker lets you choose which menus, textures, and widgets to merge. - ⇡ EXPORT — Bundle selected menus + textures + widgets into a shareable
.zippackage. - ☰ HIERARCHY / INSPECTOR — Toggle visibility of the side panels (useful on smaller screens).
- CLEAR — ⚠️ Nukes ALL local data. Use only when you want a clean slate.
- ⟳ SYNC — Re-reads textures and widgets from your browser's storage. Click this after saving icons in Texture Studio so they appear in the Menu Builder dropdowns.
- TEXTURE STUDIO — Opens the pixel-art editor in a new tab.
- DEPLOY — Compiles your workspace and gives you a sync command for in-game.
📁 Left Sidebar — Hierarchy
A list of every menu in your workspace. Each one becomes a .json file the plugin loads.
- Click an entry to select it.
- The ✕ button next to a menu deletes it (and the plugin will remove the file on next deploy).
- + CREATE at the bottom adds a fresh menu. New menus default to a 3-row layout.
🎨 Center Canvas — The Live GUI Preview
A pixel-perfect emulation of the in-game chest GUI. The bottom rows showing 27 inventory + 9 hotbar slots are cosmetic only — you can't configure them; they're just visual reference.
Mouse Controls
| Action | Behavior |
|---|---|
| Left-Click slot | Select that slot for editing. |
| Ctrl+Click slot | Add to multi-selection. Edits apply to ALL selected slots simultaneously. |
| Drag slot → slot | Swap items between slots. |
| Right-Click on slot | Context menu: Copy / Paste / Clear. |
| Right-Click on empty area | Hold and drag to pan the canvas. |
| Scroll wheel | Zoom in/out. |
| Hover item | Live tooltip preview with name + lore. |
⚙️ Right Sidebar — Inspector
The Inspector has two regions:
- Menu Properties (top) — Always visible. Configure menu-wide settings (ID, title, rows, requirements). Click the ⎈ button to collapse this section if you only want to edit slots.
- Slot Workspace (bottom) — Appears only when a slot is selected. Has 7 tabs covering visuals, all 5 click types, and conditional states.
The full breakdown of every Inspector field lives in the next sections.
🎨 The Texture Studio Interface
Open the Texture Studio by clicking TEXTURE STUDIO in the Menu Builder's top bar (or directly via your editor session).
🔀 The Three Workspace Modes
The Texture Studio has three completely different modes, switched via the top navigation. Each one transforms the entire interface.
1️⃣ Layout Mode
The simplest mode. Click any slot in the canvas to toggle whether that slot appears in the final GUI background. Useful for designing menus where you only want certain slots visible (like a 3-column shop with the rest hidden).
2️⃣ Menu Paint Mode
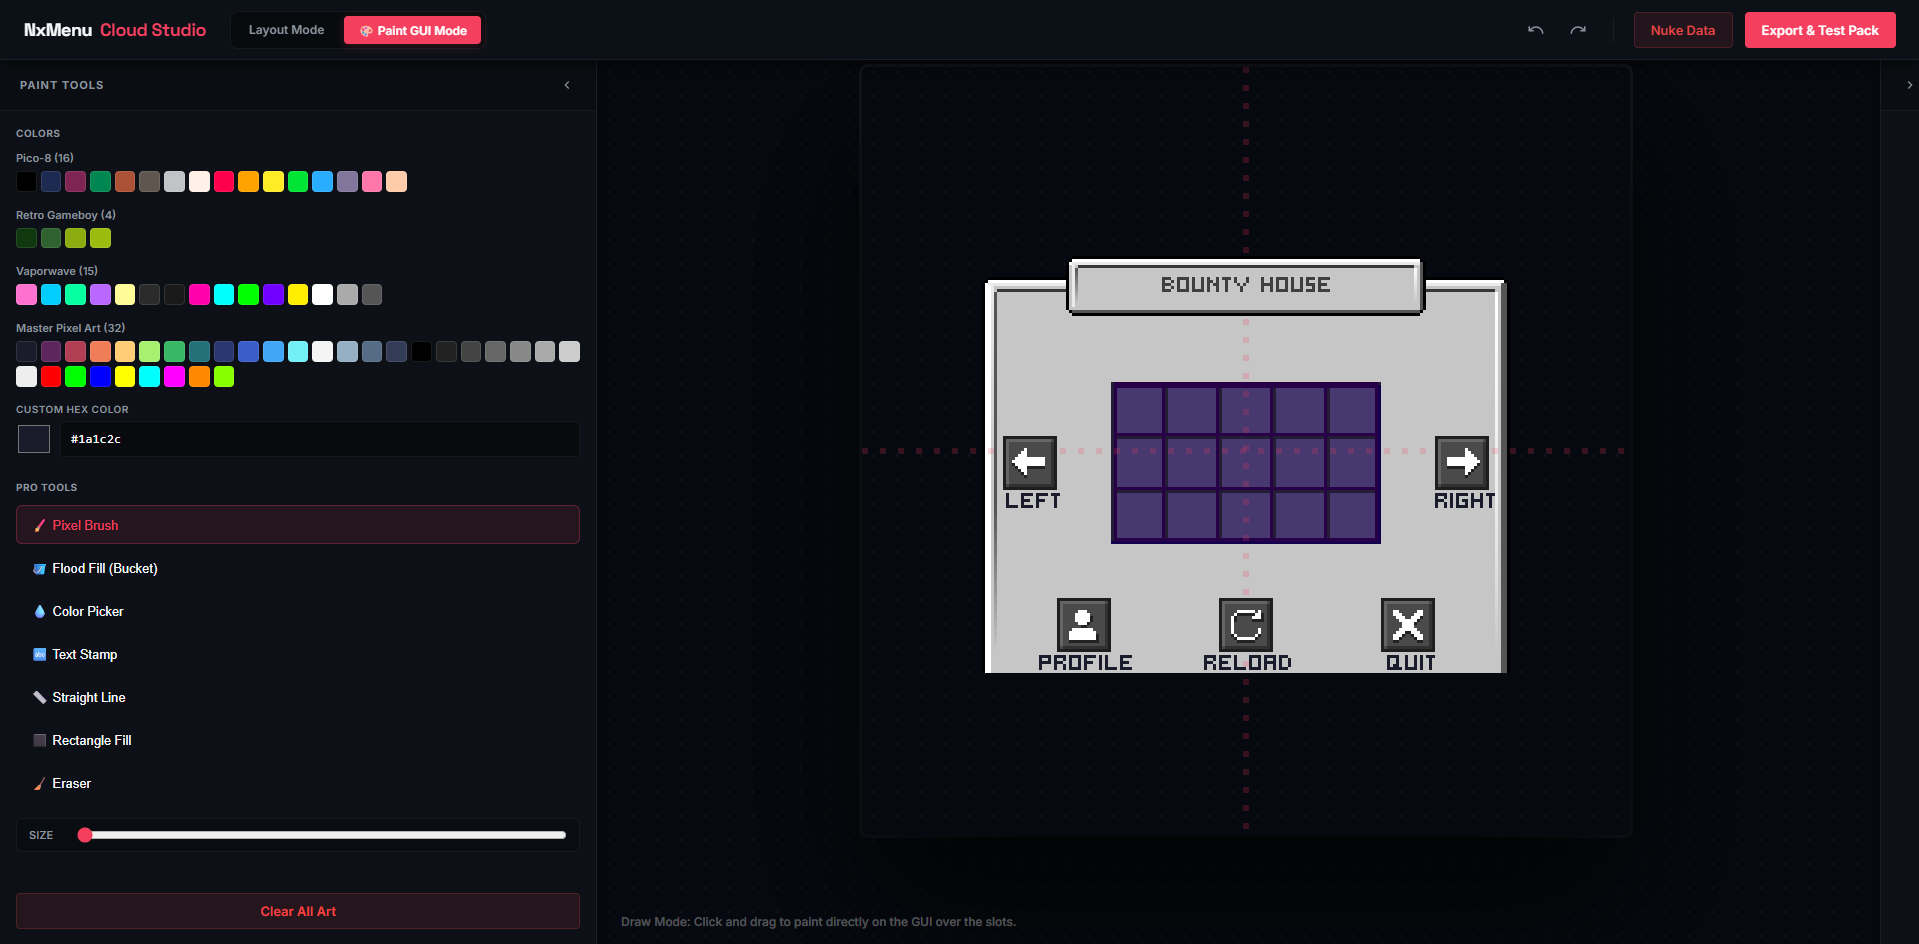
A full pixel-art editor for painting your GUI backgrounds. The left sidebar transforms into a tool panel with palettes, brushes, and a complete layer system.
Tools available:
- Brush — Standard paint with adjustable size (1–10 pixels).
- Fill — Flood-fill bucket. Replaces all connected pixels of the same color.
- Eyedropper — Pick a color from the canvas (auto-switches back to Brush after).
- Text — Stamp text using a built-in pixel font.
- Line — Click and drag to draw straight lines.
- Rectangle — Click and drag to draw rectangles.
- Eraser — Removes pixels from the active layer.
- Mirror X / Y — Symmetry toggles. Anything you draw mirrors across the chosen axis.
Color Palettes: Aseprite-inspired curated palettes including Pico-8 (16), Retro Gameboy (4), Vaporwave (15), and Master Pixel Art (32). Plus a custom color picker with hex input.
3️⃣ Custom Icons Mode
An 18×18 pixel-art editor for designing clickable item icons that map to PAPER:CMD in your menus.
Has the same tool palette (minus Text and Transform), 1× / 2× / 4× live preview, and an icon library on the left for quick switching between your saved icons.
📚 Layer System (Menu Paint Mode)
Each painted GUI is built from multiple stackable layers — just like Photoshop or Aseprite.
- Visibility toggle (eye icon) — Hide a layer without deleting it.
- Opacity slider — 0–100% per layer.
- Move Up / Down — Reorder z-stacking.
- Free Transform (▒ icon) — Drag to move, corner handles to resize, with Flip X/Y in the toolbar. Press Enter to apply, Escape to cancel.
- Duplicate / Merge Down / Flatten — Standard layer ops.
- Import Image — Upload any PNG/JPG and it pastes onto a new layer (auto-scaled to fit, max 256×256).
- Nudge buttons — 1px directional movement of the active layer.
- Double-click layer name — Rename the layer.
⌨ Keyboard Shortcuts
| Shortcut | Action |
|---|---|
Ctrl+Z | Undo (mode-aware: paints in Paint mode, icons in Icons mode) |
Ctrl+Y / Ctrl+Shift+Z | Redo |
Enter | Apply transform (when transforming a layer) |
Escape | Cancel transform |
Middle-click on icon canvas | Pick color from that pixel |
📎 Sharing Your Workspace
The Share button in the top bar generates a permanent URL containing your entire workspace. Anyone who opens that URL can clone your art into their own browser. Great for collaborating or backing up to a different machine.
📦 Material Formatting Reference
The Material field in the Visual tab accepts five different formats. This is one of the most powerful parts of NxMenu.
1️⃣ Vanilla Bukkit Materials
Any standard Spigot Material name works. Type it in UPPERCASE.
DIAMOND_SWORDNETHERITE_INGOTOAK_PLANKSPLAYER_HEAD
The Menu Builder has a built-in autocomplete dropdown showing all 1,000+ valid materials.
2️⃣ Custom Model Data Format
Append :<number> to a material to use a Custom Model Data variant from your resource pack.
PAPER:10001— Paper item with CMD 10001DIAMOND_SWORD:5— Diamond Sword with CMD 5
NxMenu uses the modern (1.21.4+) CustomModelDataComponent API automatically, with fallback to the legacy method for older servers.
3️⃣ HEAD- (Live Player Skull)
Display a 3D player skull. The texture loads dynamically based on whose name you provide.
HEAD-Notch— Static skull of the player named "Notch".HEAD-%player%— Skull of whoever is viewing the menu.HEAD-%arg1%— Skull of the first command argument (used in profile menus).
HEAD-%player% creates that classic "this menu is about ME" effect for personal stat menus, kit selectors, and profiles.4️⃣ BASEHEAD- (Custom Texture)
Display a player skull with a fully custom Mojang texture (the kind you find on minecraft-heads.com).
BASEHEAD-eyJ0ZXh0dXJlcyI6eyJTS0lOIjp7InVybCI6IiR0XC9pbWFnZS5wbmcifX19
Paste the entire base64 string after BASEHEAD-. Useful for decorative heads (gem icons, animals, custom art).
5️⃣ Custom Widget Names (from Texture Studio)
If you've drawn a custom icon in Texture Studio (e.g. gold_coin), you can use that name directly:
gold_coin
NxMenu auto-translates this to PAPER:<cmd> behind the scenes during deployment, using the Custom Model Data assigned in Texture Studio. When you reload your editor, it converts back to the friendly name automatically.
The AMOUNT Field
The Amount field accepts more than just a number:
5— Static stack of 5.%player_level%— Live updating amount based on placeholders.%vault_eco_balance%— Dynamic counter (note: max 127 per item; over that, it caps).
If your amount string contains a placeholder, the canvas preview shows {..} as a placeholder badge. The real value resolves at click time in-game.
🖼️ Custom GUI Backgrounds (The Magic Title)
This is the most powerful feature in NxMenu and also the most misunderstood. Read this whole section.
The Concept
In vanilla Minecraft, GUIs are gray with the small inventory grid. To make a custom-shaped GUI (rounded edges, custom artwork, branded backgrounds), you need to:
- Paint a 256×256 PNG of what your GUI should look like.
- Map that PNG to a Unicode character via the resource pack font system.
- Use that Unicode character + 48 negative-pixel shifts in the menu's title to make it overlay perfectly on top of the default chest GUI.
NxMenu does steps 1, 2, and 3 automatically. Here's the workflow:
Step-by-Step: Painting a Custom GUI
1. Open Texture Studio
Click TEXTURE STUDIO in the Menu Builder's top bar.
2. Create or Select a GUI
In the left sidebar (Hierarchy), click + New Menu or select an existing one.
3. Switch to Menu Paint Mode
Click Menu Paint in the top nav. The left panel transforms into the tool palette with layers.
4. Paint Your Background
Use the brush, fill, and shape tools to design your GUI. The painting overlays the default Minecraft chest grid — you'll see your art mixed with the gray slot squares in real time.
5. Configure the Unicode Character
In the right Inspector, look for the Unicode Character box. By default it's set to a 3-character hex code in the F001–FFFF range (Private Use Area). Click Auto to assign the next available code automatically.
The studio detects conflicts and warns you in red if another GUI is already using the same code.
6. Copy the Config String
Right below, you'll see a Config String box showing something like:
&f
Click the COPY badge.
7. Export the Resource Pack
Click Export Pack in the top bar. The modal gives you a download link and a test command:
/nxmenu applyedit <uuid>
Run that in-game to install the pack.
8. Connect It to a Menu in the Menu Builder
Switch back to the Menu Builder. Select your menu. In the Inspector, find the DISPLAY TITLE field. Above it, change the dropdown from TEXT to ▧ CUSTOM GUI.
A new input appears with the \uF prefix. Type the same 3-character hex you used in Texture Studio (e.g. 001).
Deploy your menu. Your custom-painted background now shows in-game.
001) and the hex you type in Menu Builder (001) must match exactly. They both reference the same Unicode character.🔗 The PAPER:CMD Bridge
Custom Model Data is how Minecraft displays a different texture on the same item type. NxMenu uses Paper as the base item for all custom icons, so you can have unlimited custom-art clickable buttons.
The Workflow
1. Draw Your Icon
In Texture Studio, switch to Custom Icons mode. Either click an existing icon to edit it, or click + New Icon.
2. Set the Icon Name and CMD
In the right Inspector:
- Icon ID / Name: A friendly identifier like
gold_coinorquest_button. Letters, numbers, underscores only. - Custom Model Data: A unique number starting at
10001. Click Auto to assign the next free one. The studio warns you of conflicts.
3. Paint the Icon
Use the 18×18 grid. Tools include brush, fill, eyedropper, line, rectangle, eraser, plus mirror X/Y. The icon auto-saves on every brush stroke release.
4. Export the Pack
Click Export Pack, run the install command in-game.
5. Use the Icon in a Menu
Switch to Menu Builder. Click ⟳ SYNC first to refresh the dropdowns. Select a slot, and in the Material field, you can either type:
gold_coin— The friendly name (auto-converts to PAPER:CMD)PAPER:10001— Direct CMD format
Both work identically.
The Special Invisible Icon (CMD 10000)
PAPER:10000. This is incredibly useful: place an invisible button over your custom-painted GUI background to create a clickable hitbox where there's no "item" visible. Perfect for buttons painted directly into the GUI background!Example: You painted a "CLOSE" button into your GUI background art. In the Menu Builder, place an item at the slot where that art appears, set Material to PAPER:10000, set Hide Tooltip to true, and add a [close] action. Players see your painted button — click it — menu closes. Looks like magic.
Custom Tooltip Suppression
For invisible buttons over GUI backgrounds, always check HIDE TOOLTIP in the Visual tab. This requires Minecraft 1.20.5+ on the server.
🖱 Click Types & Action Chains
Every slot can have up to 5 different action chains based on how the player clicks it.
The Five Click Types
| Tab | Trigger | Common Use |
|---|---|---|
| LEFT | Left mouse button | Primary action (buy, teleport, equip) |
| RIGHT | Right mouse button | Secondary action (sell, info) |
| MID | Middle/scroll wheel click | Bulk action (buy 16, preview) |
| S-L | Shift + Left click | Stack action, fast tier |
| S-R | Shift + Right click | Bulk sell, alternate option |
How Action Chains Execute
Actions run top to bottom, in order. If any [require], [take], or [cooldown] fails, the chain stops immediately and remaining actions are skipped.
Example chain on a "Buy Diamond" button:
[require] %vault_eco_balance% >= 500 &cYou need $500![require] %player_empty_slots% >= 1 &cInventory full![console] eco take %player% 500[give] DIAMOND 1[sound] ENTITY_EXPERIENCE_ORB_PICKUP[message] &aPurchased!
If the player has $400, step 1 fails and they get the deny message. Steps 2–6 never run.
Reordering Actions
Each action card has a drag handle in the header. Click and drag to reorder. The order is critical — always put gatekeeper actions ([require], [take], [cooldown]) before reward actions.
Copy & Paste Actions
Each action card has a copy icon (⎘). Click to copy that single action to clipboard. Then click the paste icon (⇣) on any other slot's tab to paste it. Massive time-saver for repeated logic across slots.
The 50-Action Loop Limit
To prevent server crashes from bad menu design, action chains are limited to 50 sequential actions per click. If you somehow chain 50+ actions, the runtime aborts and logs a warning. This is generous — most chains are 5–10 actions.
Spam Protection
NxMenu has built-in protection:
- 150ms click debounce — Prevents accidental double-clicks from running the chain twice.
- 50ms menu open spam guard — Prevents rapid-fire menu opening.
- Chain processing lock — A new chain can't start while a previous one is still mid-execution.
🧩 Action Blocks: Core Actions
Core Actions are the foundation of your menu interactivity. They handle giving items, sending messages, and manipulating the user's interface.
- Give Item: Gives the player an item directly into their inventory. You can visually input the Material, Amount, Name, and Lore.
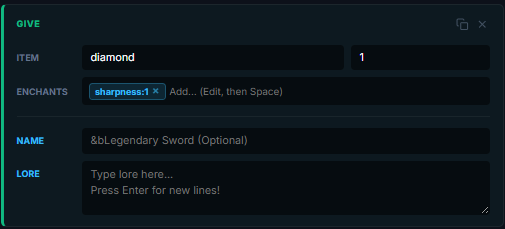
Tip: To add enchantments, type the enchant and level (e.g.,sharpness:5) into the Enchants box and press Space to lock it in. The Material field supports the same formats as a slot's Material (vanilla, PAPER:CMD, HEAD-, BASEHEAD-, custom widget).
- Take Item: Removes items from the player's inventory. Critical for shop sell logic.
⚠️ Strict Match Behavior:
By default,[take] DIAMOND 1only takes vanilla diamonds (no custom name, lore, enchants, or CMD). This protects valuable named items from being accidentally consumed.
To take a CMD-specific item, use[take] PAPER:10001 1.
If the player doesn't have enough, the deny message fires and the chain stops immediately.
- Equip Armor: Forces an item directly into a player's equipment slot (Helmet, Chestplate, Leggings, Boots, or Offhand). If the slot is already occupied, the action fails gracefully and the player gets a notification.

- Send Message: Sends a chat message to the player viewing the menu. Supports all standard Minecraft color codes including
&athrough&f, modifiers&l(bold),&m(strikethrough),&n(underline),&o(italic), and full hex via&#RRGGBB.
- Play Sound: Plays a client-side sound for the player. You can select any native Bukkit Sound enum (like
ENTITY_PLAYER_LEVELUP) from the autocomplete dropdown.
- Open Menu: Closes the current GUI and instantly opens another menu from your workspace. Select the target Menu ID from the dropdown.

Pass arguments: You can append args to send to the new menu, e.g.profile_menu %player%opens theprofile_menuwith the current player as%arg1%.
- Close GUI: Forcefully closes the inventory screen for the player. No arguments needed.

💻 Action Blocks: Commands
Command blocks allow your menu to interact directly with the server, the player, or your proxy network.
- Console Command: Executes a command in the background as the Server Console (full permissions). Do not include the
/.
Examples:eco give %player% 500lp user %player% permission set rank.vip truetellraw %player% {"text":"Hello!","color":"gold"}

- Player Command: Forces the player who clicked the item to execute a command (with their own permissions). Do not include the
/.
Example:spawn
- Connect Server: Sends a plugin message to teleport the player across your BungeeCord or Velocity network. The target server name must match the entry in your proxy config.
Example:survival
[console] over [player] for anything that requires permissions the player doesn't have (giving items, modifying ranks, world commands). Use [player] for self-actions like home/spawn/warp where the player needs to be the executor.🧠 Action Blocks: Logic & Variables
This is where NxMenu becomes a true engine. You can build advanced conditional systems, quests, daily rewards, and limits without needing any external scripting plugins.
Conditional Flow
- If Condition (Require): A gatekeeper. Choose a placeholder, an operator (
==,!=,>=,<=,>,<), and a value. If the condition fails, the chain stops and the player gets the deny message.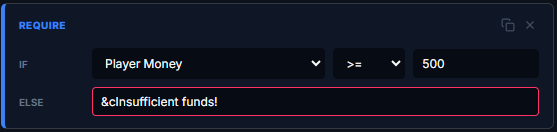
Placeholder dropdown includes common ones like%vault_eco_balance%,%player_level%, plus a Custom… option for any PlaceholderAPI placeholder, and ⎈ Meta Variable… for your custom NxMenu variables.
- Cooldown Limit: Prevents spamming. Assign a unique ID (e.g.,
daily_reward) and a time in seconds. The player cannot trigger this action again until the time expires. Use%time%in the Deny Message to display the remaining time formatted as1d 3h 22m 14s.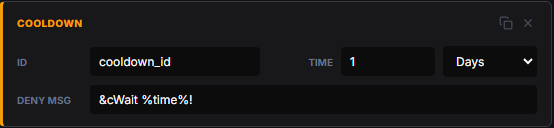
- Chat Input: Pauses the chain, closes the menu, and prompts the player to type in chat. Their response is captured into the
%input%placeholder, usable in any subsequent action. Players can typecancelto abort safely.
Example:[input] &eEnter the player to message:[console] mail send %input% &7You got a gift!
- Delay (Wait): Pauses the action chain for a set number of server ticks (20 ticks = 1 second). Useful for staggering effects.

The Meta System (Custom Variables)
Meta variables are your own custom data points, persistently tied to a player while they're online. Use them to track quests, purchase counts, daily limits, or any custom state.
- Set Variable (Meta): Forces a specific variable to an exact number or string.
Example: Sethas_claimed_kitto1.
- Add to Variable: Increments a numeric variable.
Example: Add1toshop_purchaseson every buy.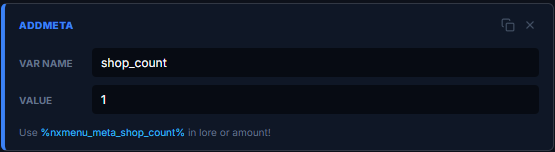
- Subtract from Var: Decrements a numeric variable.
Example: Subtract1fromremaining_lives.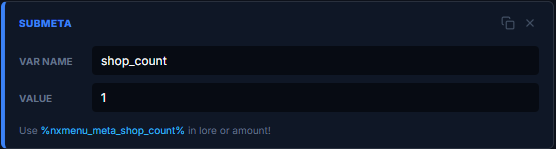
Once a variable exists, reference it anywhere with
%nxmenu_meta_<keyname>%:• In item lore:
&7Purchases: &e%nxmenu_meta_shop_purchases%• In amount field:
%nxmenu_meta_quest_progress% (live updating count)• In If Conditions: Check
%nxmenu_meta_purchases% <= 5 for purchase limits• In state conditions: To swap item visuals based on progress
Limits: Max 50 keys per player, max 32 chars per key name. Variables clear when the player disconnects (in-memory only).
➡ The State System (Conditional Item Overrides)
The State System lets a single slot show different visuals and run different actions based on conditions. This is the secret to building dynamic menus that change without writing duplicate slot configs.
The Concept
Every slot has a base item (Material, Name, Lore, click actions). On top of that, you can stack override states. Each state has:
- A condition (e.g.
%vault_eco_balance% < 500) - Optional overrides for: Material, Name, Lore, click actions
When the menu renders, NxMenu checks each state top to bottom. The first matching state wins. Any field not overridden by the state falls back to the base item.
Example: Locked/Unlocked Buy Button
Base Item:
- Material:
DIAMOND - Name:
&b&lBuy Diamond - Lore:
&7Costs $500 - Left-click: Buy logic
Override State 1: If %vault_eco_balance% < 500
- Material:
BARRIER - Name:
&c&lLocked - Lore:
&cYou need $500 to unlock - Left-click: Empty (no buy logic)
Now, when a poor player views the menu, they see a red barrier. When they earn $500, the slot transforms into a buyable diamond automatically (refresh on menu update interval).
Adding a State
- Click a slot.
- Switch to the ⟡ STATE tab.
- Click + ADD OVERRIDE.
- Set the IF condition (placeholder + operator + value).
- Set the override Material, Name, and/or Lore (leave blank to inherit from base).
- Optionally override click actions per click type.
Real-World Use Cases
- Quest Progress: Show grayed-out item until
%nxmenu_meta_quest_done% == 1 - Permission-locked Items: Display "VIP Only" until
%hasperm_rank.vip% == yes - Cooldown Indicators: Switch the icon to a clock when on cooldown
- Daily Reward Flag: Change to a green checkmark after
%nxmenu_meta_claimed_today% == 1 - Stock System: Show "OUT OF STOCK" when
%nxmenu_meta_stock% <= 0
20 = 1 second) to make the menu live-update so states swap automatically as conditions change. Don't set this too low (5 ticks = 4 redraws/sec is overkill).🧩 Placeholders — Complete Reference
NxMenu has its own built-in placeholders plus full PlaceholderAPI integration. You can use placeholders in:
- Menu Title
- Item Name and Lore
- Item Amount
- Action arguments (commands, messages)
- Conditions (require, state)
Built-in Player Placeholders
| Placeholder | Returns |
|---|---|
%player% / %player_name% | The viewer's username |
%player_level% | XP level (integer) |
%player_health% | Current HP, rounded to integer |
%player_ping% | Network latency in ms |
%player_empty_slots% | Number of free inventory slots (0–36) |
Boolean/Permission Placeholders
| Placeholder | Returns |
|---|---|
%isonline_<name>% | true or false |
%hasperm_<node>% | yes or no |
Example: %hasperm_essentials.fly% returns yes or no.
Custom Variables (Meta System)
| Placeholder | Returns |
|---|---|
%nxmenu_meta_<key>% | Your custom variable's value (defaults to 0 if unset) |
Command Argument Placeholders
| Placeholder | Returns |
|---|---|
%args_count% | Total number of args passed to the menu command |
%arg1%, %arg2%, ... | Specific argument by position |
%args% | All args joined by spaces |
If no args are passed, %arg1% defaults to the player's own name. This means a self-profile menu works whether the player runs /profile or /profile Notch.
🔥 Target Placeholders (Advanced)
This is one of NxMenu's most powerful features. You can resolve any placeholder against a different player using the colon-target syntax.
Syntax:
<target>:<placeholder>
Where <target> can be:
- A literal username (e.g.
Notch:%vault_eco_balance%) - An arg placeholder (e.g.
%arg1%:%player_level%)
Use Case: Player Profile Menu
You build a /whois <player> menu. The viewer runs /whois Notch. In the menu:
- Item Name:
&b%arg1%'s Profile→ "Notch's Profile" - Lore line 1:
&7Money: &a$%arg1%:%vault_eco_balance%→ Notch's actual balance - Lore line 2:
&7Level: &e%arg1%:%player_level%→ Notch's actual level - Lore line 3:
&7Online: &a%isonline_%arg1%%→ "true" if Notch is online - Material:
HEAD-%arg1%→ Notch's actual skull
One menu config now works for any player.
Special Placeholders
| Placeholder | Context |
|---|---|
%input% | Player's chat response after a [input] action |
%time% | Formatted remaining cooldown (used in [cooldown] deny msg) |
PlaceholderAPI
If PlaceholderAPI is installed on your server, any PAPI placeholder works automatically. Examples:
%vault_eco_balance%— Vault economy balance- Anything from any expansion you've installed.
🎯 Building Player Profile Menus
Args (command arguments) are the secret to building parameterized menus — menus that change based on input. They power player profile menus, target-specific actions, and dynamic GUIs.
How Args Work
When a menu opens, args are everything that comes after the menu command:
/profile Notch → %arg1% = Notch
/whois Notch admin → %arg1% = Notch, %arg2% = admin
If no args are provided, NxMenu falls back to the viewer's own name as %arg1%. This makes self-targeting menus work seamlessly.
Step-by-Step: Building a /profile Menu
Step 1: Create the Menu
- FILE ID:
profile_menu - TRIGGER:
profile - DISPLAY TITLE:
&8» &b%arg1%'s Profile - ROWS:
3
Step 2: Build the Avatar Slot
Place an item at slot 13 (center):
- Material:
HEAD-%arg1% - Name:
&b%arg1% - Lore:
&7Level: &e%arg1%:%player_level%&7Money: &a$%arg1%:%vault_eco_balance%&7Status: &f%isonline_%arg1%%
Step 3: Add an Open Requirement
To prevent crashes from typos in player names, set the menu's Open Requirement to:
- Type: ONLINE CHECK
- Target:
%arg1% - Deny msg:
&cThat player is offline or doesn't exist!
Step 4: Deploy
Run /profile Notch in-game and watch the magic.
Passing Args to Submenus
When using the [menu] action, you can pass args by appending them after the menu ID:
[menu] friend_actions %arg1%— Opensfriend_actionsmenu with the same target[menu] confirm_purchase 500 diamond— Opens with arg1=500, arg2=diamond
The Magic Default
/profile with no args, %arg1% defaults to their own name. This means the same menu works as both "my profile" and "someone else's profile" without any extra config.🚫 Restricting Menu Access
Sometimes you want to lock a menu down based on permissions, conditions, or world. NxMenu has three layers of access control.
Layer 1: Open Requirements
The Inspector has an OPEN REQUIREMENT card with four modes:
NONE
Any player who can run the trigger command can open the menu.
STANDARD
Custom condition. Choose a placeholder, operator, and value.
Example: %player_level% >= 10 &cYou need level 10!
ONLINE CHECK
Verify a target player is currently online. The default target is %arg1%, perfect for profile menus.
Example: Target = %arg1%, Deny = &cThat player is offline!
PERMISSION
Check a permission node.
Example: Perm = nxmenu.shop.vip, Deny = &cVIP rank required!
Layer 2: World Restrictions
The Inspector has DENY WORLDS and DENY MSG fields:
- DENY WORLDS: Comma-separated list of world names where the menu is blocked
- DENY MSG: Message shown if a player tries to open it in a blocked world
Example: Set DENY WORLDS to pvp_arena, dungeon_1 to prevent menu access in combat zones.
Layer 3: Per-Slot Conditions
Even if a player can open the menu, individual slots can have their own gates via [require] action blocks or State System overrides. See the State System section for details.
Best Practices
- Use Open Requirements for high-level access (rank checks, level gates).
- Use Deny Worlds for context restrictions (no shop in PvP areas).
- Use per-slot [require] for fine-grained item-level gating (e.g. need money for THIS purchase).
- Use States when you want to show the locked state visually instead of blocking access entirely.
❖ The Shop Generator Wizard
The Shop Generator builds a complete 4-way shop block in a single click. It's the fastest way to set up traditional buy/sell trading.
Opening the Wizard
Inside any click action tab (LEFT, RIGHT, MID, S-L, S-R), look for the small ❖ button next to the +. Click it.
What It Asks
- ITEM: The material being traded (e.g.
DIAMOND) - BUY PRICE: Cost per single item (set to
0to disable buying) - SELL PRICE: Payout per single item (set to
0to disable selling)
What It Generates
The wizard auto-builds a full 4-way shop with all click handlers:
| Click | Action |
|---|---|
| LEFT | Buy 1 (with balance check, inv-space check, eco take, give item, sound) |
| RIGHT | Sell 1 (with item-have check, eco give, sound) |
| MIDDLE | Buy 16 stack (16x cost, 16x give) |
| SHIFT-RIGHT | Sell 16 (bulk sell) |
Plus:
- Auto-generated lore showing all four prices and current balance
- An auto-created State Override showing a red "Cannot Afford" version when player balance is too low
- Sound effects for both successful trades
Customizing After Generation
The generated chains aren't locked — they're just normal action chains. You can edit, reorder, add steps, or change deny messages freely. Just open each tab and tweak.
eco take and eco give, which are Vault standards.📤 Sharing Workspaces (Packages)
NxMenu's Package system lets you share complete setups — menus, GUI canvases, and custom icons — between servers, team members, or as templates.
Exporting a Package
- Click ⇡ EXPORT in the top bar.
- A modal shows three columns:
- Logic Menus — Your menu configurations (slots, actions, conditions)
- Texture Canvases — Your painted GUI backgrounds from Texture Studio
- Custom Widgets — Your 18×18 icons (with their CMD numbers)
- Check the items you want to bundle. Use the TOGGLE button at the top of each column to select all/none in that group.
- Click GENERATE .ZIP. Your browser downloads a
nxpkg_xxxxx.zipfile.
The ZIP is a self-contained package with a JSON manifest. Send it to anyone running NxMenu.
Importing a Package
- Click ⇣ IMPORT in the top bar.
- Choose a
.zipor.jsonfile. - The same 3-column picker appears, showing what's inside.
- Check what you want to merge into your workspace. Items NOT checked are skipped.
- Click MERGE WORKSPACE.
Conflict Handling
NxMenu handles ID and CMD conflicts intelligently:
- Menu ID conflicts: Imported menus get suffixed with
_1,_2, etc. (e.g.shopbecomesshop_1). - Texture name conflicts: Same auto-suffix system.
- Unicode conflicts: Automatically reassigns next available F-range hex.
- CMD conflicts: The original CMD is preserved if free; otherwise the icon imports without a CMD (you assign one manually).
Sharing via URL (Texture Studio Only)
The Texture Studio also has a Share button that generates a permanent URL containing your full workspace. Anyone who opens that link clones your work into their own browser. Useful for quick collaboration without ZIP files.
• Selling pre-built menu templates on marketplaces
• Backing up your work to a different machine
• Sharing GUI designs with your design team
• Distributing community templates
📦 Automated Resource Pack Compilation
NxMenu eliminates the headache of building resource packs manually. Click one button and it compiles everything.
What Gets Compiled
When you click Export Pack in Texture Studio, the cloud compiler generates:
- GUI textures — Each painted canvas becomes a 256×256 PNG.
- Custom item textures — Each 18×18 icon becomes a PNG with a matching JSON model.
- Font providers —
default.jsonwith bitmap mappings for every GUI texture. - Paper item override —
paper.jsonusing the modernrange_dispatchmodel with all your CMD entries. - Invisible CMD 10000 — Auto-generated 16×16 transparent paper for clickable hitboxes.
- Reference files —
nxmenu_titles.txtandnxmenu_cmd_list.txtwith human-readable mappings.
Three Pack Variants
The Export modal gives you three downloads:
1. Java Pack
Standard Vanilla resource pack format. Drop into resourcepacks/ on the client, or host on a CDN and serve via your server's resource-pack setting in server.properties.
2. ItemsAdder Pack
Pre-formatted for ItemsAdder. The internal structure uses nxmenu/resourcepack/ root, so you can extract directly into your plugins/ItemsAdder/contents/ folder. ItemsAdder will pick it up on next zip-pack rebuild.
3. Bedrock Addon
A two-pack bundle for Geyser-Spigot servers. See the Bedrock Compatibility section.
Quick Testing
Use the test command from the modal:
/nxmenu applyedit <uuid>
The plugin applies your latest pack instantly. Test links expire after 1 hour for security.
Slot Highlight Toggle
The Export modal has a Slot Highlight toggle:
- Disabled (default): NxMenu injects empty sprites that suppress Minecraft's default white slot highlight on hover. Cleaner look for custom-painted GUIs.
- Enabled: Vanilla slot hover behavior is preserved. Use this if your GUI design relies on showing slot positions.
Toggling this auto-recompiles the pack if you've already exported once.
Custom Fonts
The Texture Studio's right Inspector has a Custom Font uploader. You can upload a .ttf, .otf, .woff, or .woff2 to preview your title rendered in that font on the canvas.
📱 Bedrock Edition (via Geyser)
NxMenu has full Bedrock support — with caveats. Here's exactly what works.
What Works on Bedrock
- ✅ All menu logic — click actions, conditions, variables, states
- ✅ Custom GUI backgrounds (with the Bedrock UI overlay pack)
- ✅ Custom icons (via Geyser item mappings)
- ✅ Heads (HEAD- and BASEHEAD-)
- ✅ PlaceholderAPI integration
What Doesn't Work
- ⚠️ Shift-click reliability (Bedrock players can't shift-click in inventories on touch/controller)
- ⚠️ Middle-click on touch devices (no middle button on phones)
Recommendation: If you have a large Bedrock playerbase, prefer LEFT and RIGHT click handlers as the primary interactions. Use Shift/Middle for power-user shortcuts only.
Setting Up Bedrock
The Texture Studio's Export modal includes a Bedrock Addon download. The ZIP contains:
Geyser-Spigot/packs/nxmenu_geyser_pack.zip— Bedrock item textures with CMD→bedrock_identifier mappingsGeyser-Spigot/packs/nxmenu_ui_pack.mcpack— UI overlay pack for custom GUI backgroundsGeyser-Spigot/custom_mappings/geyser_mappings.json— The Geyser item mapping config
Installation:
- Download and extract the Bedrock ZIP.
- Copy the contents of the
Geyser-Spigotfolder into yourplugins/Geyser-Spigot/folder, preserving subfolder structure. - Restart your server (or run
/geyser reload). - Bedrock players will now see your custom item icons and GUI backgrounds.
How the Bedrock UI Pack Works
NxMenu uses a clever trick: when a menu's title contains a special § sequence, the Bedrock UI pack detects it and overlays the matching custom GUI background on top of the standard chest screen. This happens entirely client-side via Bedrock's UI definition system.
For Bedrock players, your menu still functions exactly the same — clicks register, actions execute, items appear. The only difference is the texture rendering pipeline.
⚙️ Commands
| Command | Description |
|---|---|
/nxmenu editor |
Generates a secure URL to open your Menu Builder workspace. |
/nxmenu applyedit <uuid> |
Downloads and syncs menu layout changes from the cloud. Generated by clicking DEPLOY. |
/nxmenu open <menuId> [args...] |
Opens a specific menu manually. Useful for NPC commands, citizens scripts, or right-click block events. Args become %arg1%, %arg2%, etc. |
/nxmenu reload |
Reloads local JSON menu files and plugin configuration without restarting. |
Triggers vs. Manual Open
You have two ways to open menus in-game:
- TRIGGER field: Set in the Inspector. Becomes a global slash command (e.g. set TRIGGER to
shop→ players run/shop). Triggers can pass args automatically. - /nxmenu open: The universal opener. Works for any menu regardless of trigger setting. Useful when you want submenus that aren't directly callable, or for triggering menus from NPCs/blocks.
Examples
/shop— Player runs the trigger, opens the shop./nxmenu open profile_menu Notch— Opens profile menu for Notch./nxmenu open quest_menu daily— Opens quest menu with arg1=daily (you can use this in conditions).
🔐 Permissions
NxMenu uses a single administrative permission node.
| Permission | Description | Default |
|---|---|---|
nxmenu.admin |
Grants access to the web editor, applying edits, reloading the plugin, and testing resource packs. | OP |
Player Access Control
Regular players don't need any specific NxMenu permissions to use menus. They just run the trigger command (or click an NPC, etc.) and the menu opens.
To restrict who can open specific menus, use one of these layers (covered in detail in the Open Requirements section):
- Open Requirement (PERMISSION mode) — Block menu opening based on a permission node.
- Per-action [require] — Block specific clicks based on permissions or conditions.
- Bukkit command permissions — Use a permission plugin (LuckPerms, etc.) to restrict who can run the trigger command itself.
Example Permission Setup
Want only VIPs to access /vipshop?
- In the Menu Builder, set OPEN REQUIREMENT to PERMISSION mode.
- Set perm to
group.vip(or whatever your VIP node is). - Set deny msg to
&cThis is for VIPs only!. - Deploy.
Non-VIPs running /vipshop get the deny message instead of the menu.
❓ Frequently Asked Questions
Why did my editor link expire?
For security, editor sessions expire after 1 hour of inactivity. While the tab is open, NxMenu sends a heartbeat every 5 minutes to keep your session alive. If you closed the tab and came back hours later, just run /nxmenu editor in-game again — your work is saved locally in your browser, so you pick up exactly where you left off.
Does this work on Bedrock?
Yes! All menu logic, click actions, and conditions work perfectly on Bedrock via GeyserMC. Custom item icons and GUI backgrounds also work if you install the Bedrock Addon pack (see the Bedrock section). The only caveat is shift-click and middle-click reliability on touch/controller devices.
Can I use my Texture Studio art in other plugins?
Yes! When you Export Pack, download the Java Pack ZIP. Inside you'll find nxmenu_titles.txt and nxmenu_cmd_list.txt with the exact Unicode characters and CMD numbers for everything you painted. You can use those values in any other plugin (DeluxeMenus, ChestCommands, etc.).
Why isn't my custom icon showing up in the Menu Builder dropdown?
After saving icons in Texture Studio, you need to click the ⟳ SYNC button in the Menu Builder's top bar. This re-reads the local storage and refreshes the material autocomplete list.
What's the difference between [require] in actions vs Open Requirements vs State conditions?
- Open Requirements — Gates the entire menu. If failed, the menu doesn't open at all.
- [require] in actions — Gates a specific click chain. If failed, that click does nothing (deny msg fires).
- State conditions — Visually changes a slot's appearance and click behavior based on conditions, without blocking access.
Why does [take] sometimes not work even when the player has the item?
NxMenu's [take] is strict by default — it only matches vanilla items with no custom name, lore, enchants, or CMD. This prevents accidentally consuming named/enchanted items. To take a CMD-specific item, use [take] PAPER:10001 1 instead of [take] PAPER 1.
How do I make a menu that opens for another player?
Use args. Set the menu's TRIGGER to profile. When a player runs /profile Notch, %arg1% becomes Notch. Use %arg1%:%placeholder% syntax to read Notch's data. See the Args & Player Profiles section for a full walkthrough.
Why is my custom GUI background not aligning correctly?
Three things to check:
- The hex code in Texture Studio's Unicode field must match exactly the hex you paste in the Menu Builder's Custom GUI input.
- Make sure the resource pack is actually applied client-side. Run the test command from the Export modal.
- The Menu Builder's title-mode dropdown must be set to ▧ CUSTOM GUI, not TEXT.
How many menus and icons can I create?
There's no hard limit on menus, GUI canvases, or icons. CMD numbers run from 10001 to over 2,000,000,000, so you essentially have unlimited room. Browser localStorage holds approximately 10MB of workspace data.
Can multiple admins edit the same workspace?
Each admin's workspace is local to their browser. To share, use the Share button in Texture Studio (URL-based) or the Export Package system in Menu Builder (ZIP-based). Note: there's no real-time multiplayer editing — work in shifts and re-share when changes are made.
Do meta variables persist across server restarts?
No. Meta variables (%nxmenu_meta_*%) are stored in memory and clear when the player disconnects or the server restarts. For persistent data, use a permission plugin's metadata or write to a database via console commands.